> ## Documentation Index
> Fetch the complete documentation index at: https://docs.topsort.com/llms.txt
> Use this file to discover all available pages before exploring further.

# Vendors Metadata

> Vendors Metadata is a new feature that allows you to manage vendor specific attributes through metadata.

export const ChangelogActions = () => {
  return <>
      <style>{`
        .changelog-actions {
          display: flex;
          justify-content: center;
          gap: 12px;
          margin-top: 2rem;
          padding-top: 1.5rem;
          border-top: 1px solid #e5e7eb;
        }
        
        [data-theme="dark"] .changelog-actions {
          border-top-color: #374151;
        }
        
        .changelog-btn {
          display: inline-flex;
          align-items: center;
          gap: 6px;
          padding: 8px 16px;
          border-radius: 9999px;
          border: 1px solid #d1d5db;
          background: transparent;
          color: #6b7280;
          font-size: 14px;
          cursor: pointer;
          transition: all 0.2s ease;
        }
        
        .changelog-btn:hover {
          border-color: #9ca3af;
          background: #f9fafb;
        }
        
        [data-theme="dark"] .changelog-btn {
          border-color: #4b5563;
          color: #9ca3af;
        }
        
        [data-theme="dark"] .changelog-btn:hover {
          border-color: #6b7280;
          background: #1f2937;
        }
      `}</style>
      <div className="changelog-actions">
        <button className="changelog-btn" onClick={() => {
    const btn = event.target.closest("button");
    btn.innerHTML = "❤️ Like";
    btn.style.borderColor = "#ec4899";
  }}>
          🤍 Like
        </button>
        <button className="changelog-btn" onClick={() => {
    const btn = event.target.closest("button");
    navigator.clipboard.writeText(window.location.href);
    const originalContent = btn.innerHTML;
    btn.innerHTML = "✓ Copied";
    btn.style.borderColor = "#22c55e";
    btn.style.color = "#22c55e";
    setTimeout(() => {
      btn.innerHTML = originalContent;
      btn.style.borderColor = "";
      btn.style.color = "";
    }, 2000);
  }}>
          ↗ Share
        </button>
      </div>
    </>;
};

<div style={{ display: "flex", gap: "8px", flexWrap: "wrap", marginBottom: "16px" }}>
  <Badge color="gray" size="sm" icon="calendar">July 1, 2025</Badge>
  <Badge color="blue" size="sm" icon="rectangle-ad">Ad Platform</Badge>
  <Badge color="green" size="sm" icon="sparkles">New Feature</Badge>
</div>

We've launched **Vendors Metadata**, a new feature that allows you to manage vendor specific attributes through metadata. This feature enables you to define and manage custom attributes for vendors, enhancing your ability to tailor data to specific needs and visibility.

## Key Benefits

**Custom Vendor Attributes**:
Define and manage vendor specific attributes through metadata

**Improved Reporting**:
Generate reports with vendor metadata for better insights

**Add categories**:
Create custom categories for vendors to view insights from each category

## How It Works

Vendors Metadata allows you to create custom metadata fields for vendors, which can be used to store additional information relevant to your business needs. This metadata can be utilized in reporting and analytics, providing deeper insights of your advertisers.

<Aside>First you have to reach out to your Topsort representative to enable this feature for your account and add the metadata fields.</Aside>

The fields can be **free text** or **dropdown selector**.

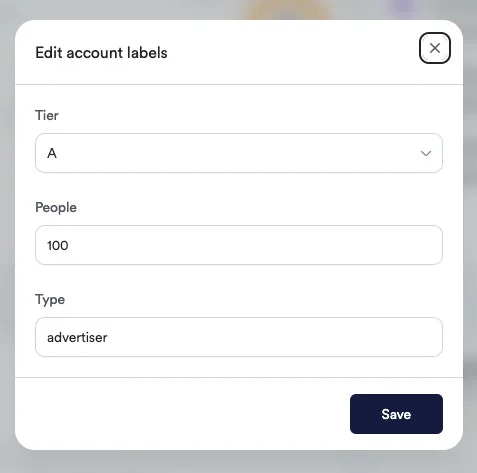
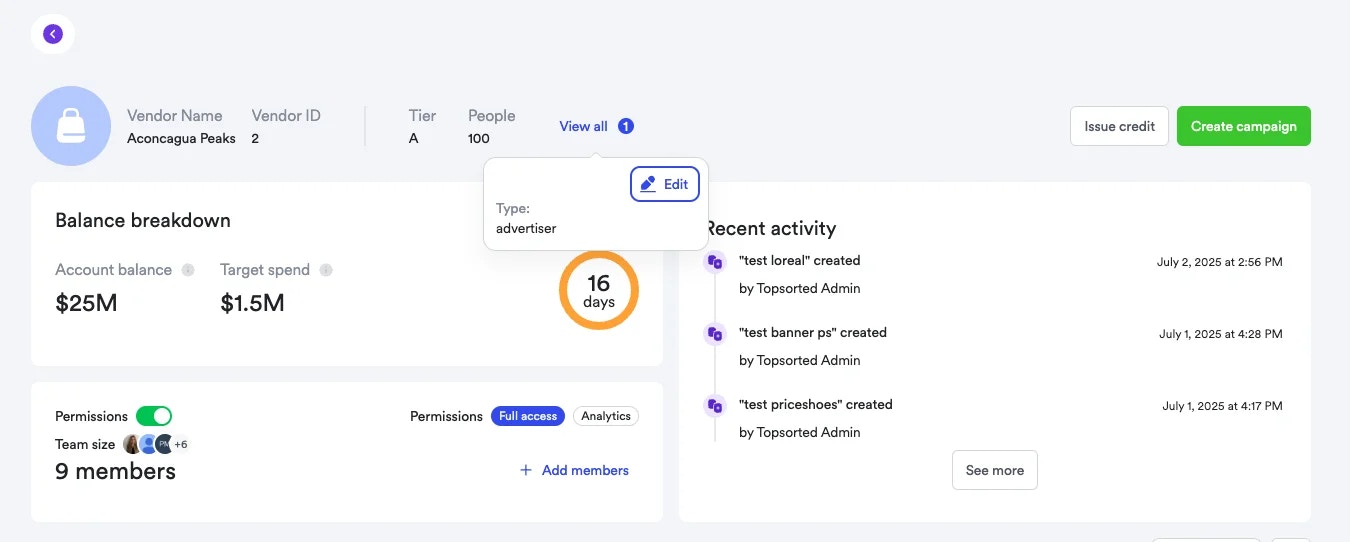
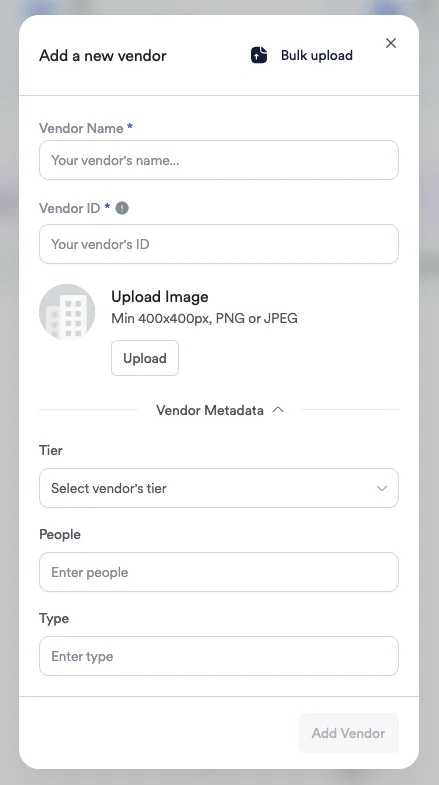
In this example, we have created the following metadata fields:

* **Tier**: A dropdown selector with options like A, B, C, D, E
* **People**: A free text field to enter the number of people in the vendor's team
* **Type**: A free text field to specify the type of vendor

Once the metadata fields are set up, you can:

1. Add vendor specific attributes to your vendors when creating one

<Frame>
  <img src="https://mintcdn.com/topsort/M3N4mDiL0uw6VdTk/images/changelog/create-metadata.webp?fit=max&auto=format&n=M3N4mDiL0uw6VdTk&q=85&s=17986b3d351d3411dd3625d1d5f5d696" alt="Toppie Analytics on DSP-side" width="439" height="785" data-path="images/changelog/create-metadata.webp" />
</Frame>

2. Edit or remove vendor metadata as needed

<Frame>
  <img src="https://mintcdn.com/topsort/M3N4mDiL0uw6VdTk/images/changelog/edit-metadata.webp?fit=max&auto=format&n=M3N4mDiL0uw6VdTk&q=85&s=7da06bb7e9aa63253e58288f62fcad7c" alt="Toppie Analytics on DSP-side" width="477" height="473" data-path="images/changelog/edit-metadata.webp" />
</Frame>

3. View vendor metadata in the vendor dashboard

<Frame>
  <img src="https://mintcdn.com/topsort/kKtg9wT2hJn2uG4V/images/changelog/view-metadata.webp?fit=max&auto=format&n=kKtg9wT2hJn2uG4V&q=85&s=29a4c3eeaa68203826204ada9980011b" alt="Toppie Analytics on DSP-side" width="1350" height="542" data-path="images/changelog/view-metadata.webp" />
</Frame>

4. **Use these attributes in reporting and analytics:** We integrate this metadata into our dataroom reporting tools, allowing you to filter and analyze data based on vendor attributes.
<ChangelogActions />