> ## Documentation Index
> Fetch the complete documentation index at: https://docs.topsort.com/llms.txt
> Use this file to discover all available pages before exploring further.

# Create Sponsored Listings Campaigns

export const LastUpdated = ({date, lang = "en"}) => {
  const translations = {
    en: "Last updated:",
    es: "Última actualización:",
    pt: "Última atualização:",
    fr: "Dernière mise à jour:",
    de: "Zuletzt aktualisiert:"
  };
  const label = translations[lang] || translations.en;
  return <>
<style>{`
.last-updated-component {
display: inline-flex;
align-items: center;
gap: 8px;
padding: 10px 16px;
border-radius: 8px;
margin-top: 12px;
margin-bottom: 16px;
font-size: 14px;
background-color: rgba(0, 0, 0, 0.05);
border: 1px solid rgba(0, 0, 0, 0.12);
color: rgba(0, 0, 0, 0.75);
line-height: 1;
}

        .last-updated-component svg {
          flex-shrink: 0;
          vertical-align: middle;
        }

        .last-updated-component span {
          display: inline-flex !important;
          align-items: center !important;
          line-height: 1 !important;
        }

        [data-theme="dark"] .last-updated-component {
          background-color: #3a3a3a;
          border: 2px solid #888888;
          color: #ffffff;
        }

        [data-theme="dark"] .last-updated-component svg {
          stroke: #ffffff;
        }
      `}</style>
      <div className="last-updated-component">
        <svg width="16" height="16" viewBox="0 0 24 24" fill="none" stroke="currentColor" strokeWidth="2" strokeLinecap="round" strokeLinejoin="round">
          <circle cx="12" cy="12" r="10" />
          <polyline points="12 6 12 12 16 14" />
        </svg>
        <span>
          <strong style={{
    fontWeight: 600
  }}>{label}</strong> 
          <time dateTime={date}>{date}</time>
        </span>
      </div>
    </>;
};

<div style={{ textAlign: "justify", marginBottom: "1.5rem" }}>
  Sponsored Listing Campaigns allow you to promote products from the catalog.
  You can easily set one up in both the marketplace and self-service dashboards
  by clicking the "Create Campaign" button and choosing "Sponsored listings."
</div>

## How It Works

<Steps>
  <Step title="Choose Your Products">
    <div style={{textAlign: 'justify', marginBottom: '1.5rem'}}>
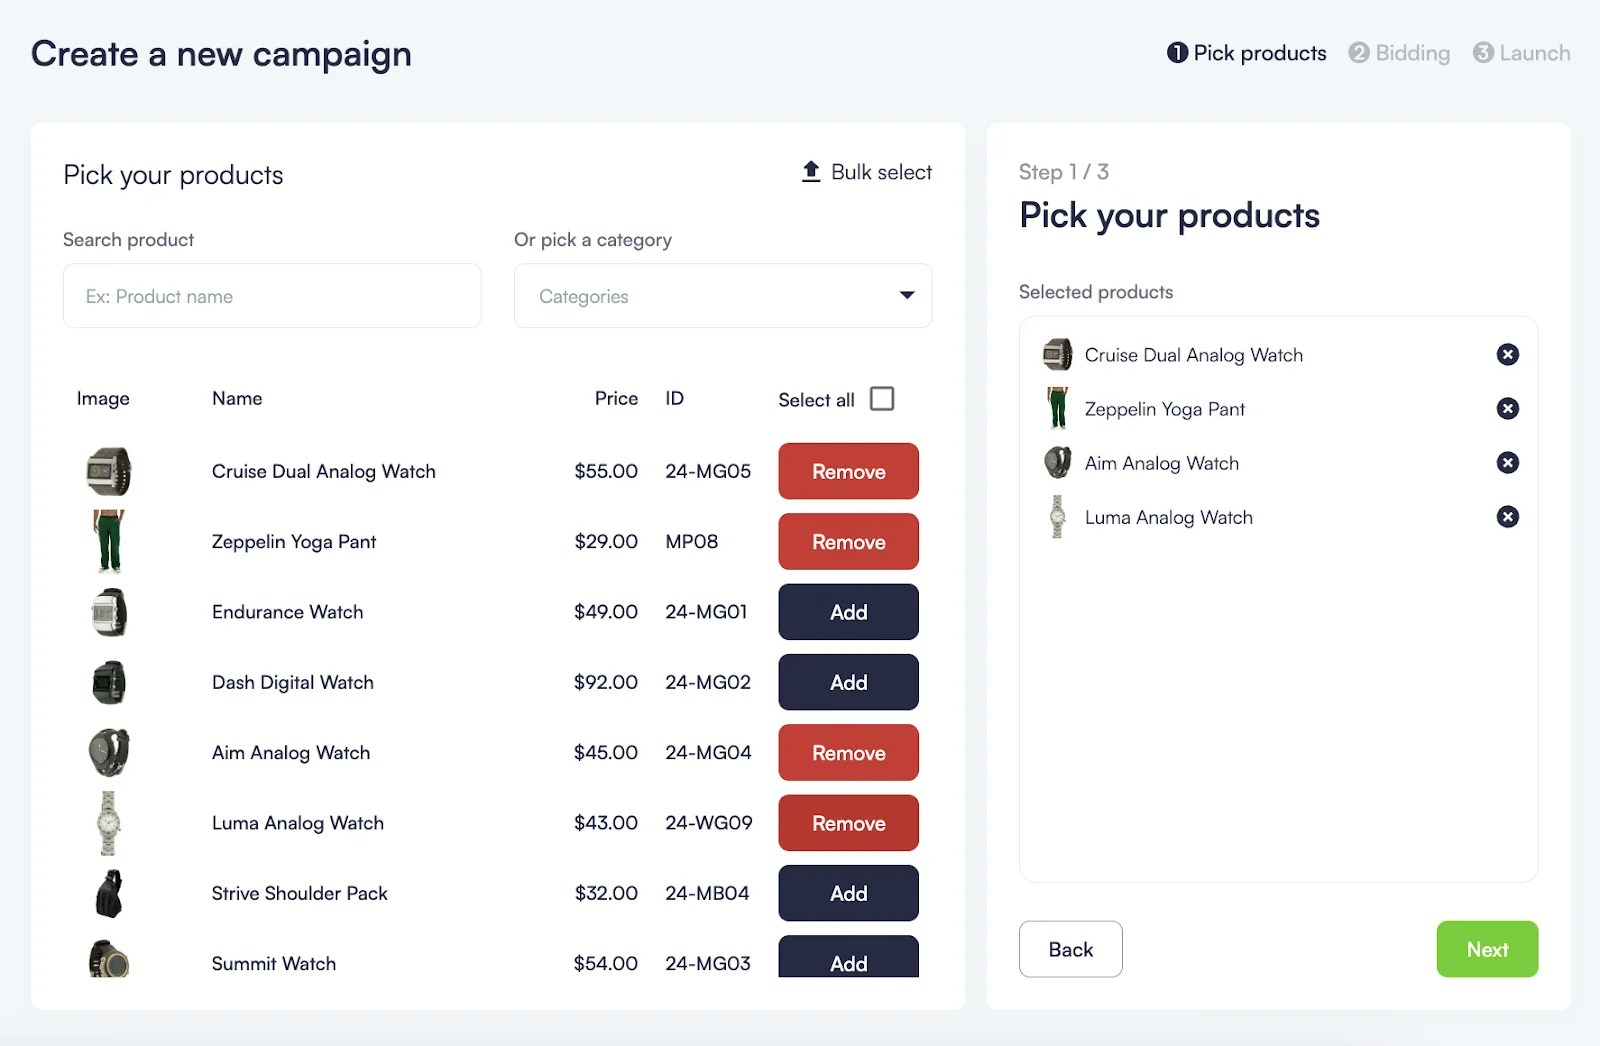
      First, you select the products you want to promote from your catalog. You can search or browse products by name or category and add as many as needed. If you have many products, you can use the "Bulk Select" button to upload a CSV file with your product IDs to add them all at once.
    </div>

    <Frame>
      <img src="https://mintcdn.com/topsort/FVdFH6-GAInpFZWG/images/knowledge-base/ad-platform-listings-index-product-add.webp?fit=max&auto=format&n=FVdFH6-GAInpFZWG&q=85&s=81b175e27fb0cda0ea44ab113b701695" alt="Page layout showing for index functionality." width="1600" height="1046" data-path="images/knowledge-base/ad-platform-listings-index-product-add.webp" />
    </Frame>
  </Step>

  <Step title="Set Your Bid">
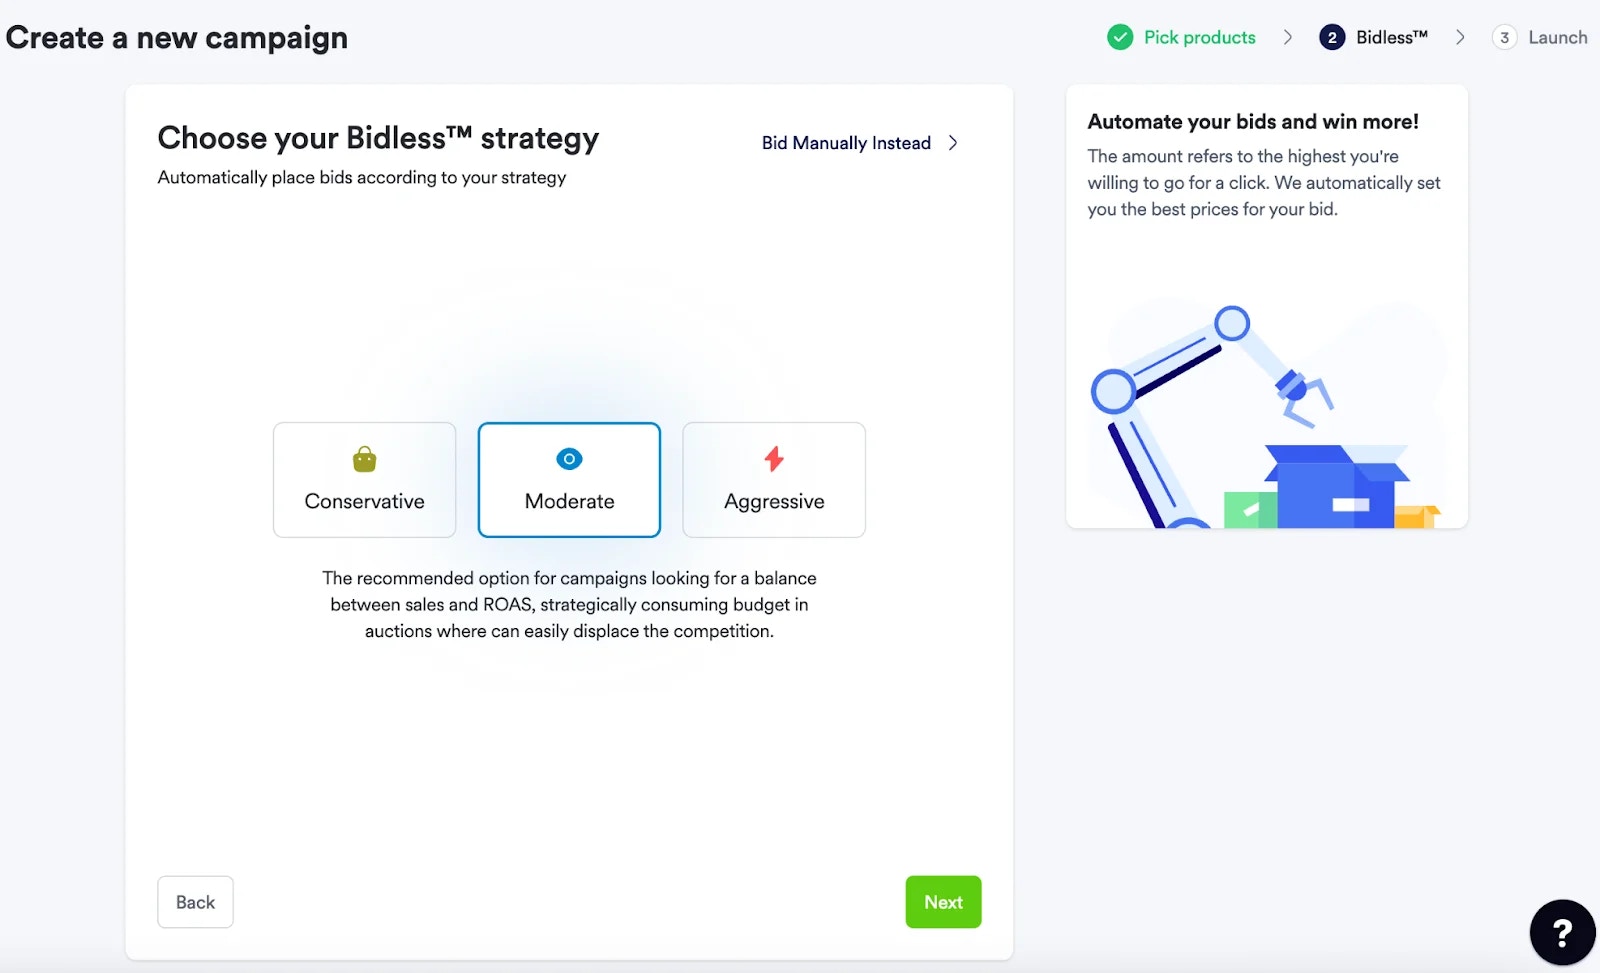
    Next, you decide how much you will bid per click for the products in your campaign. Check the [Bidding Types](/en/knowledge-base/ad-platform/campaign-creation/bidding-types/) section of this Knowledge Base for more information.
    <Frame>
      <img src="https://mintcdn.com/topsort/FVdFH6-GAInpFZWG/images/knowledge-base/ad-platform-listings-index-campaign-bidding-strategy.webp?fit=max&auto=format&n=FVdFH6-GAInpFZWG&q=85&s=961bead0cf49a84fa597dff53154adc6" alt="Screenshot of the user interface displaying for index functionality." width="1600" height="973" data-path="images/knowledge-base/ad-platform-listings-index-campaign-bidding-strategy.webp" />
    </Frame>
  </Step>

  <Step title="Launch Campaign Settings">
    <div style={{textAlign: 'justify', marginBottom: '1.5rem'}}>
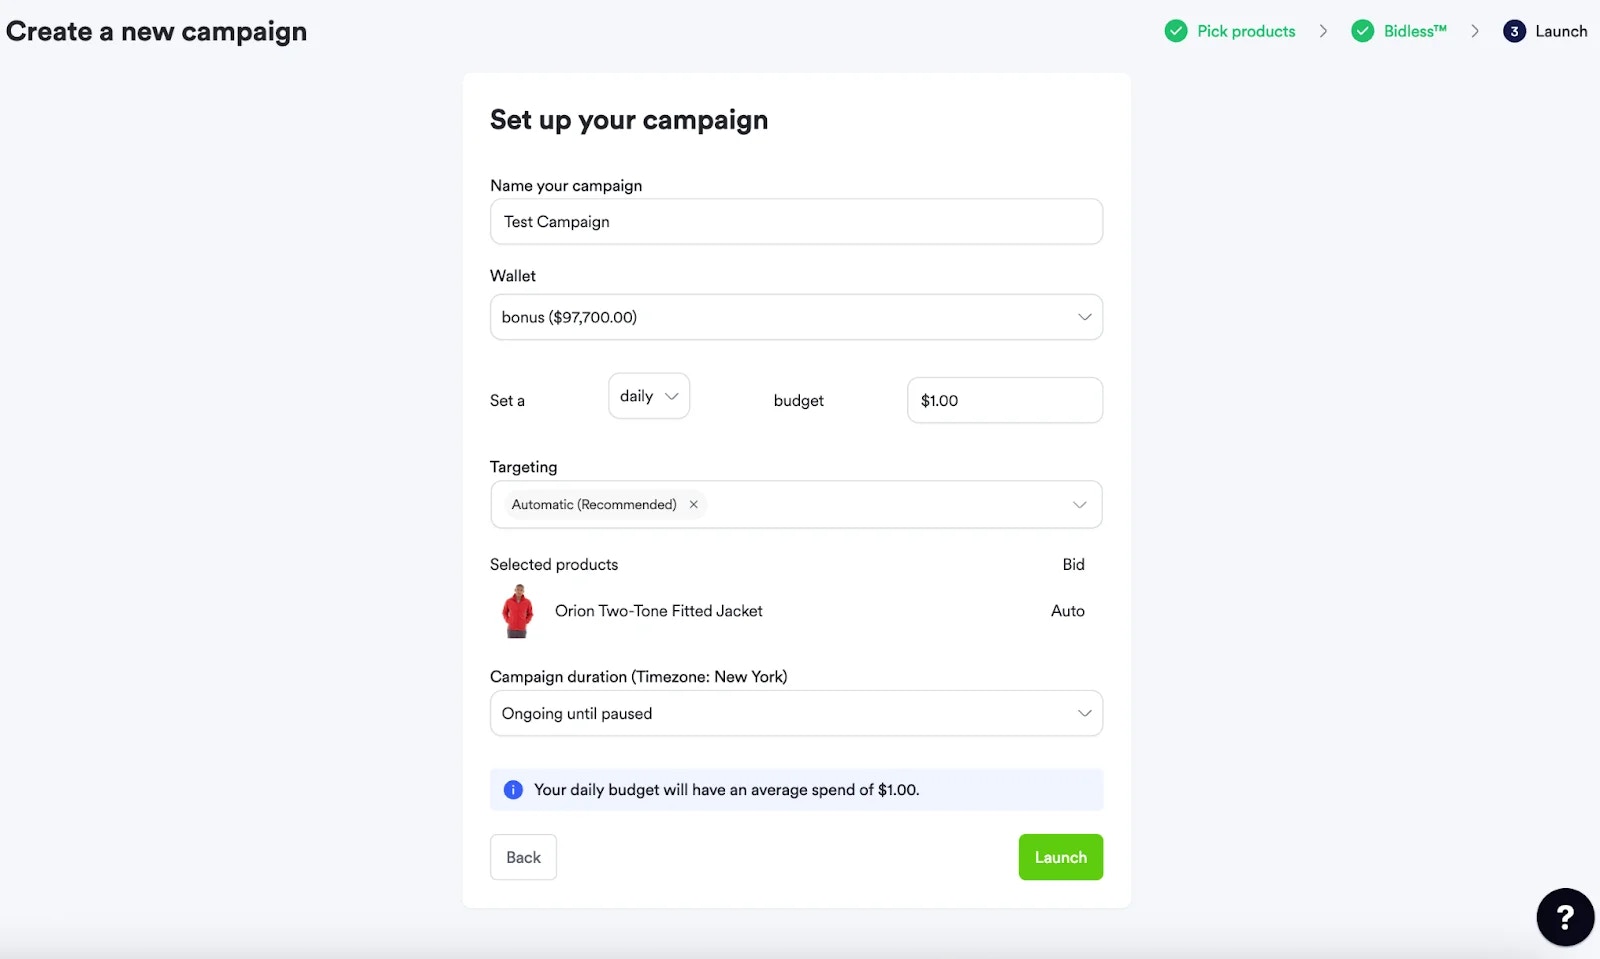
      Before launching, fill out the final details. Give your campaign a name (only visible to you and other internal users). Set how long the campaign should run, either by picking an end date or letting it run continuously until you stop it. Choose your maximum daily, weekly, or monthly budget. You can also set a location for targeting, either automatically or manually. Once done, press launch to make your campaign active. Check the [Campaign Configuration](/en/knowledge-base/ad-platform/campaign-creation/bidding-types/) and [Campaign Targeting](/en/knowledge-base/ad-platform/campaign-targeting/) sections for more information.
    </div>

    <Frame>
      <img src="https://mintcdn.com/topsort/FVdFH6-GAInpFZWG/images/knowledge-base/ad-platform-listings-index-campaign-launch.webp?fit=max&auto=format&n=FVdFH6-GAInpFZWG&q=85&s=19b59a635838c6385119da90174f1906" alt="Screenshot of the user interface displaying for index functionality." width="1600" height="959" data-path="images/knowledge-base/ad-platform-listings-index-campaign-launch.webp" />
    </Frame>
  </Step>
</Steps>

<div style={{ textAlign: "justify", marginBottom: "1.5rem" }}>
  Refer to the [Running Auctions](/en/knowledge-base/ad-server/auctions/)
  section to learn more about how to get winners for sponsored listings.
</div>

***

<LastUpdated date="2025-11-18" />
